Garage door sensor lights are a built-in communication system that tells you exactly when something is wrong with your sensors. When those lights blink, go dark, or change color unexpectedly, the door will stop closing, leaving your home exposed until the issue is resolved.
Knowing how to fix garage door sensor lights starts with understanding what causes them to fail. This guide walks you through the common causes, warning signs, simple fixes you can check on your own, and when to call a professional for garage door repair.
What Do the Colors of Garage Door Sensor Lights Mean?
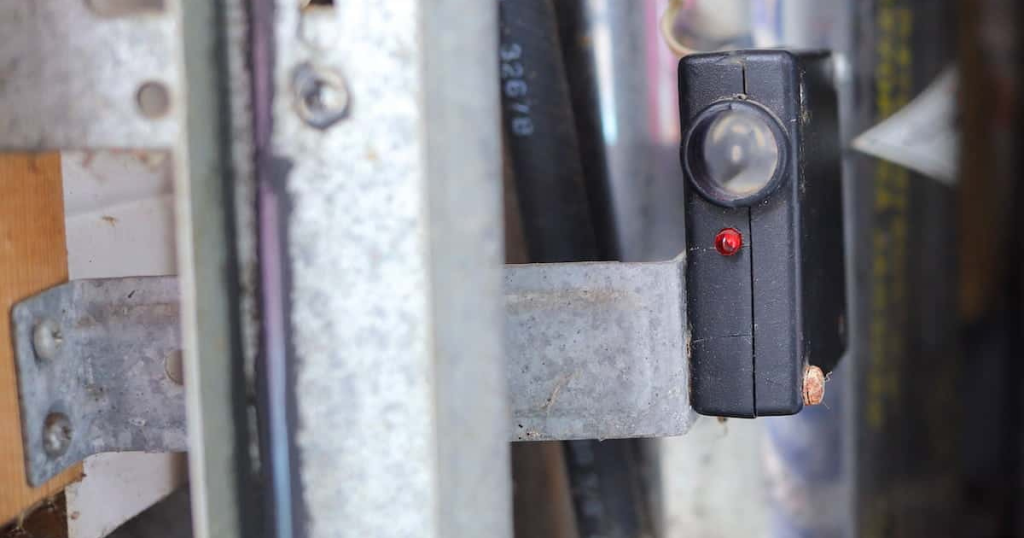
Garage door sensor lights use color to tell you the exact condition of your sensors, and knowing what each color means is the foundation of any sensor troubleshooting process.
| Light Color | Which Sensor | What It Means |
| Solid Green | Sending Sensor | Powered and transmitting correctly |
| Solid Amber/Yellow | Receiving Sensor | Receiving the infrared beam correctly |
| Blinking Green | Sending Sensor | Sensor is misaligned, or the signal is interrupted |
| Blinking Amber | Receiving Sensor | Beam is blocked, or the sensor is not receiving a signal |
| No Light | Either Sensor | No power reaching the sensor |
| Red Light | Either Sensor | Sensor has detected a fault or failure |
To understand what each color means for your garage door, read our guide on What Color Should Garage Door Sensor Lights Be?, which breaks down every sensor light color and what it means for your system.
Why Do Garage Door Sensor Lights Fail?
Garage door sensor lights fail for several reasons, and identifying the right one is what makes the difference between a quick fix and a recurring problem.
Here are the most common reasons garage door sensor lights stop working:
- Dust, cobwebs, and moisture build up on the sensor lenses and block the invisible beam over time
- A sensor bracket gets knocked out of position by a vehicle, bike, or nearby object
- Wires fray or loosen from friction and interrupt the power supply to the sensor
- Vibrations from the opener motor gradually shift the sensors off their original angle
- Rodents chew through wiring and cause a complete loss of signal
To see the full list of issues that stem from these causes, check out our article on Common Garage Door Sensor Lights Problems to Know, which covers the most frequent sensor problems homeowners run into.
Warning Signs Your Garage Door Safety Sensor Is Failing
Knowing the warning signs of a failing garage door safety sensor helps you act before a minor issue turns into a full system problem.
Here are the warning signs to watch for:
- Garage door sensor yellow light or orange light flickers or dims instead of staying solid
- The door reverses on its own without anything blocking its path
- The sensor light blinks repeatedly even after clearing the area around it
- Indicator lights on both sensors no longer match their expected colors
- The opener light blinks several times in a row, and the door refuses to close
Ignoring these warning signs for long enough can put your household at risk and lead to emergency garage door repair.
What Happens When Garage Door Sensor Lights Stop Working?
Failing garage door sensor lights put the entire garage door system at risk and create problems that go well beyond an inconvenient door.
Here is what happens when garage door sensor lights stop working:
- The door refuses to close, leaving your garage open and exposed
- Automatic garage door closes without detecting people, pets, or vehicles in its path
- The opener motor works harder to compensate, shortening the lifespan of the entire system
- Water damage and theft become real risks when the garage cannot be secured properly
- Repeated malfunctions put extra strain on the tracks, springs, and other components
Addressing sensor light failure promptly protects your belongings, your family, and the long-term functionality of your garage door system.
How to Troubleshoot Garage Door Sensor Lights by Light Pattern
Garage door sensor troubleshooting becomes much easier when you know exactly what each light pattern means.
Here is what each light pattern means:
| Light Pattern | What It Means | Likely Cause |
| Both lights off | No power reaching the sensors | Wiring failure or power supply issue |
| Blinking or flickering light | Sensors are not communicating | Misalignment or partial obstruction |
| Solid light on one sensor only | Receiving sensor is not detecting the signal | Misalignment or damaged sending sensor |
| Steady lights, but the door will not close | Sensors appear fine, but the system is not responding | Internal sensor fault or opener issue |
| Rapidly blinking opener light | Built-in diagnostic code has been triggered | Specific sensor or wiring problem |
Matching the light pattern to the correct cause is the first step toward an effective fix for your garage door sensor lights.
Common Fixes for Garage Door Sensor Lights You Can Try
Clean the Sensor Lenses
Dirty sensor lenses are one of the most overlooked causes of garage door sensor lights failure, and a quick cleaning often restores normal operation immediately.
Here is how to clean your sensor lenses properly:
- Wipe both lenses gently using a soft, dry cloth or microfiber cloth to remove surface buildup
- Remove cobwebs, dust, and debris from around the sensor housing and bracket
- Avoid harsh chemicals or abrasive materials that could scratch the lens surface
- Check if the indicator lights return to their normal steady colors after cleaning
Regular cleaning of the sensor lenses keeps the infrared beam unobstructed and the system functioning correctly.
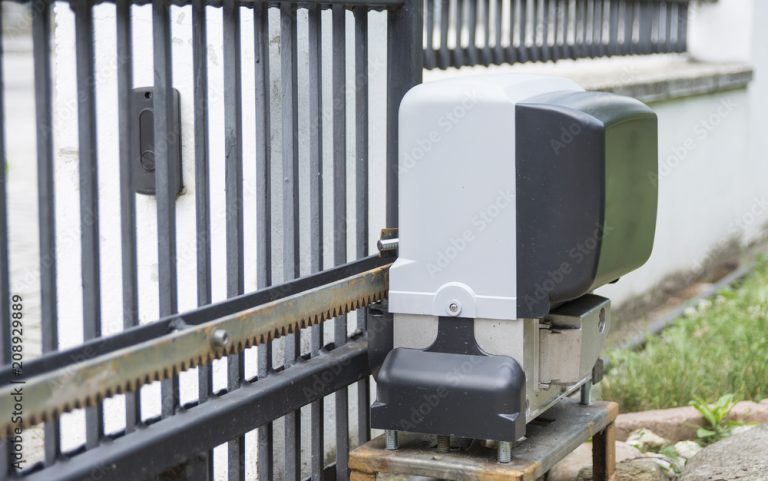
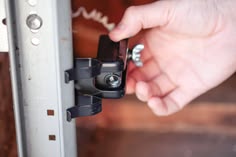
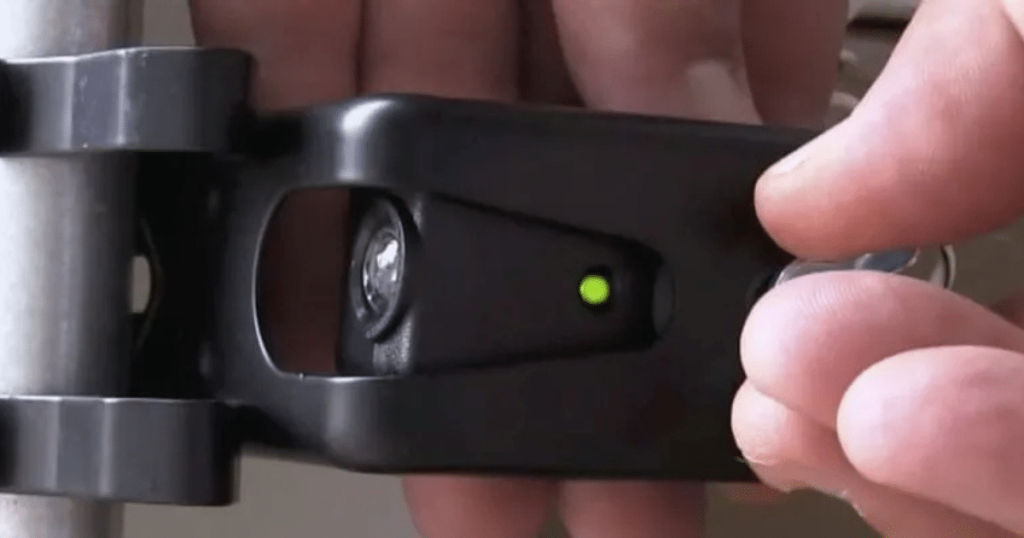
Realign the Sensors
Misalignment is one of the most frequent causes of sensor failure, and a careful adjustment is usually enough to get the lights back to normal.
Follow these steps to realign garage door sensors:
- Loosen the wing nut on the sensor bracket so the sensor moves freely
- Slowly adjust the sensor until the LED light turns solid and steady
- Tighten the wing nut carefully so the sensor holds its corrected position
- Test the door through several cycles to confirm the alignment is holding
Proper sensor alignment restores the infrared beam connection, allowing the door to close without interruption.
Clear the Path of Obstructions
An obstruction anywhere near the sensor beam prevents the door from closing, and removing it is often the fastest fix.
Walk through these checks to clear the sensor path:
- Remove tools, toys, or boxes stored too close to the side of the garage door
- Move seasonal items like bikes or sleds away from the sensor beam path
- Clear spiderwebs or hanging debris stretched across the beam between the two sensors
- Sweep away leaf buildup or dirt on the floor directly in front of either sensor
Keeping the area around both sensors clear gives the beam an unobstructed path and restores normal door operation.
Check the Wiring and Connections
Loose or damaged wiring is a reliable sign that the sensor is not receiving the power or signal it needs to work correctly.
Go through these checks when inspecting your sensor wiring:
- Look for frayed, pinched, or broken wires from the sensor to the motor unit
- Check wire connections at the sensor terminal for looseness
- Inspect stapled wires along the wall for damaged or compressed insulation
- Look for burn marks, corrosion, or visible wear along any section of wiring
Identifying a wiring problem early gives a professional technician a clear starting point for an accurate and effective repair.
Address Sunlight Interference
Direct sunlight hitting the receiving sensor is a commonly misdiagnosed cause of garage door sensor light problems, particularly during certain seasons.
Run through these checks to confirm sunlight interference:
- Sensor issues happen most often in the early morning or late afternoon
- The receiving sensor light flickers or goes out only at specific times of day
- Covering the receiving sensor temporarily resolves the problem
- Issues disappear on overcast days or when the sun shifts position
Shielding the receiving sensor from direct sunlight eliminates signal disruption and restores steady communication between the two sensors.
When to Stop Garage Door Sensor Troubleshooting and Call a Pro
Garage door sensor troubleshooting has limits, and recognizing those limits protects your system from further damage.
Here are the signs that professional help is needed:
- Basic fixes have been attempted more than once, and the problem keeps coming back
- Visible wiring damage, burn marks, or corroded components are present
- One or both sensor lights will not respond at all, despite checking power and connections
- The door continues to malfunction after cleaning, realignment, and obstruction removal
- Opener repeatedly blinks an error code that does not resolve on its own
Persistent sensor issues that go beyond basic checks require garage door opener repair by a trained professional to be diagnosed and resolved correctly.
How Professionals Handle Garage Door Sensor Repair
Professional garage door sensor repair goes well beyond a basic check, covering every part of the system that affects sensor performance.
Here is what a professional does during a garage door sensor repair visit:
- Runs a full diagnostic on the sensor signal output to confirm what is and is not working
- Inspects the complete wiring path from the sensor to the motor unit for breaks or faults
- Realigns and calibrates both sensors to factory specifications using proper alignment tools
- Replaces damaged sensors, wiring, or components with parts that meet original safety standards
- Tests the full system through multiple cycles to confirm everything is working correctly
Hiring a professional for sensor repair gives you accurate results and the confidence that the job was done to the standard your garage door system requires.
How Much Does Garage Door Sensor Repair Cost in St. Louis?
Garage door sensor repair cost in St. Louis vary depending on several factors, and understanding what influences the price helps you plan accordingly.
Here are the factors that affect the average cost of garage door sensor repair:
- Type of repair needed, whether it is a simple alignment or a full wiring replacement
- Brand and model of the garage door opener, since some systems require specific parts
- Age and condition of the existing sensors and surrounding components
- Number of sensors that need attention during the same service visit
- Labor rates in the St. Louis area, which vary between service providers
The average cost may depend on the extent of the damage, and a professional inspection is the most accurate way to get a clear estimate for your specific situation.
When to Consider Replacing Your Garage Door Sensor Lights
Repair is not always the most practical option, and knowing when to replace your garage door sensor lights saves you from repeated service calls.
Here are the signs that replacement is the better choice:
- Sensors are more than ten years old and have a history of recurring problems
- Physical cracks, corrosion, or heavy wear make the sensor housing unreliable
- Repair costs have added up across multiple service visits within the same year
- The sensor model is no longer manufactured, and compatible parts are difficult to source
- Upgrading to a modern sensor system improves performance and meets current safety standards
To explore everything involved in making that decision, read our guide on When to Replace Your Garage Door Sensor Lights, which walks you through every factor worth considering before moving forward.
How to Maintain Your Garage Door Sensors After Fixing
Keeping your garage door sensors in good condition after a repair is the best way to extend their lifespan and avoid repeat issues.
Here is how to maintain your garage door sensors after fixing:
- Wipe both sensor lenses monthly with a soft, dry cloth to remove dust and moisture
- Check that both sensors are pointed directly at each other and neither has shifted
- Inspect wiring connections periodically to confirm nothing has come loose
- Test the door monthly by placing an object in its path to verify the sensors respond correctly
- Schedule a professional inspection once a year to catch potential issues early
Consistent maintenance after fixing keeps your garage door sensors performing reliably and reduces the likelihood of needing another repair.
Fix Your Garage Door Sensor Lights the Right Way With Professional Help
Garage door sensor lights that fail affect the performance and protection of your entire garage door system, and every issue covered in this guide points to one clear conclusion. Understanding the causes, warning signs, and available fixes gives you the knowledge to act quickly and make the right call for your home.
Guardian Door and Gate has been helping St. Louis homeowners get their garage door sensor lights working correctly through accurate diagnostics, professional repairs, and dependable garage door services. Contact us or give us a call today, and let our team assess exactly what your system needs to get back to full working order.
Frequently Asked Questions
How do I know if my garage door sensor has been reset successfully?
A successful reset shows both sensor lights returning to their normal steady colors with no blinking or flickering. The door should also complete a full closing cycle without reversing, which confirms that both sensors are communicating correctly.
Does cleaning the sensor lenses actually make a difference in how the system performs?
Yes, it makes a significant difference. Buildup of dust, cobwebs, and moisture weakens the signal between the two sensors over time, and many issues that appear serious turn out to be resolved with a thorough lens cleaning.
What should I check first when my garage door sensor lights stop working after a power outage?
Check the power supply to the opener first, including the outlet, circuit breaker, and any connected fuses. Once power is confirmed, test the sensors to see if the lights return to normal, since a sudden power interruption can sometimes disrupt the sensor connection even after electricity is restored.
Is it possible for a garage door sensor to work intermittently before failing completely?
Yes, intermittent function is one of the most common early signs of sensor failure. Sensors that sometimes work and sometimes fail are usually dealing with a wiring issue or internal component wear that worsens with each use.
Can sensor light problems affect how the garage door opener responds to a remote?
Yes, they can directly affect remote response. When sensors are not communicating correctly, the opener may ignore remote commands to close the door as a built-in safety measure, and resolving the sensor issue typically restores normal remote operation.
What does a garage door sensor orange light indicate after realignment has already been attempted?
A persistent garage door sensor orange light after realignment usually points to a deeper issue beyond positioning alone. Internal sensor damage, wiring faults, or a failed component inside the unit are the most likely causes, and a professional inspection is the most reliable way to identify what needs to be addressed.
How long does a professional garage door sensor repair typically take?
Most professional sensor repairs are completed within one to two hours, depending on the complexity of the issue. A straightforward alignment or wiring fix takes considerably less time than a full sensor replacement.
Can dirt on just one sensor cause the entire garage door system to stop working?
Yes, buildup on even one sensor lens is enough to break the infrared beam and prevent the door from closing. Both sensors must maintain a clear line of sight for the system to function, which is why regular lens cleaning is essential for garage door maintenance.
At what point is it worth calling a professional instead of continuing to troubleshoot on your own?
Calling a professional makes sense when basic fixes have been tried more than once without lasting results. Recurring sensor failure points to an underlying issue with the wiring or internal components that requires proper diagnostic tools and expertise to resolve correctly.